Building a cedar V8 IOM. Designed by Ian Vickers
June 2012
I have sailed and raced mostly dinghies all my life, Lasers for the last 25 years.
I trained as a wooden boatbuilder in the sixties and during my working life have built carvel fishing boats, cold moulded yachts, aluminium launches and yachts. On retiring from my job as manager of Dickson Marine, a boatbuilding yard in Nelson, which also specialised in refits of vessels from 40’ to 80’ I took up a long held ambition to race and build RC yachts.
So I bought a 6 year old Martin Firebrace IOM design, a modified Victory 3 which incorporates a chine over the aft 200 mm and commenced to teach myself how to sail these yachts.

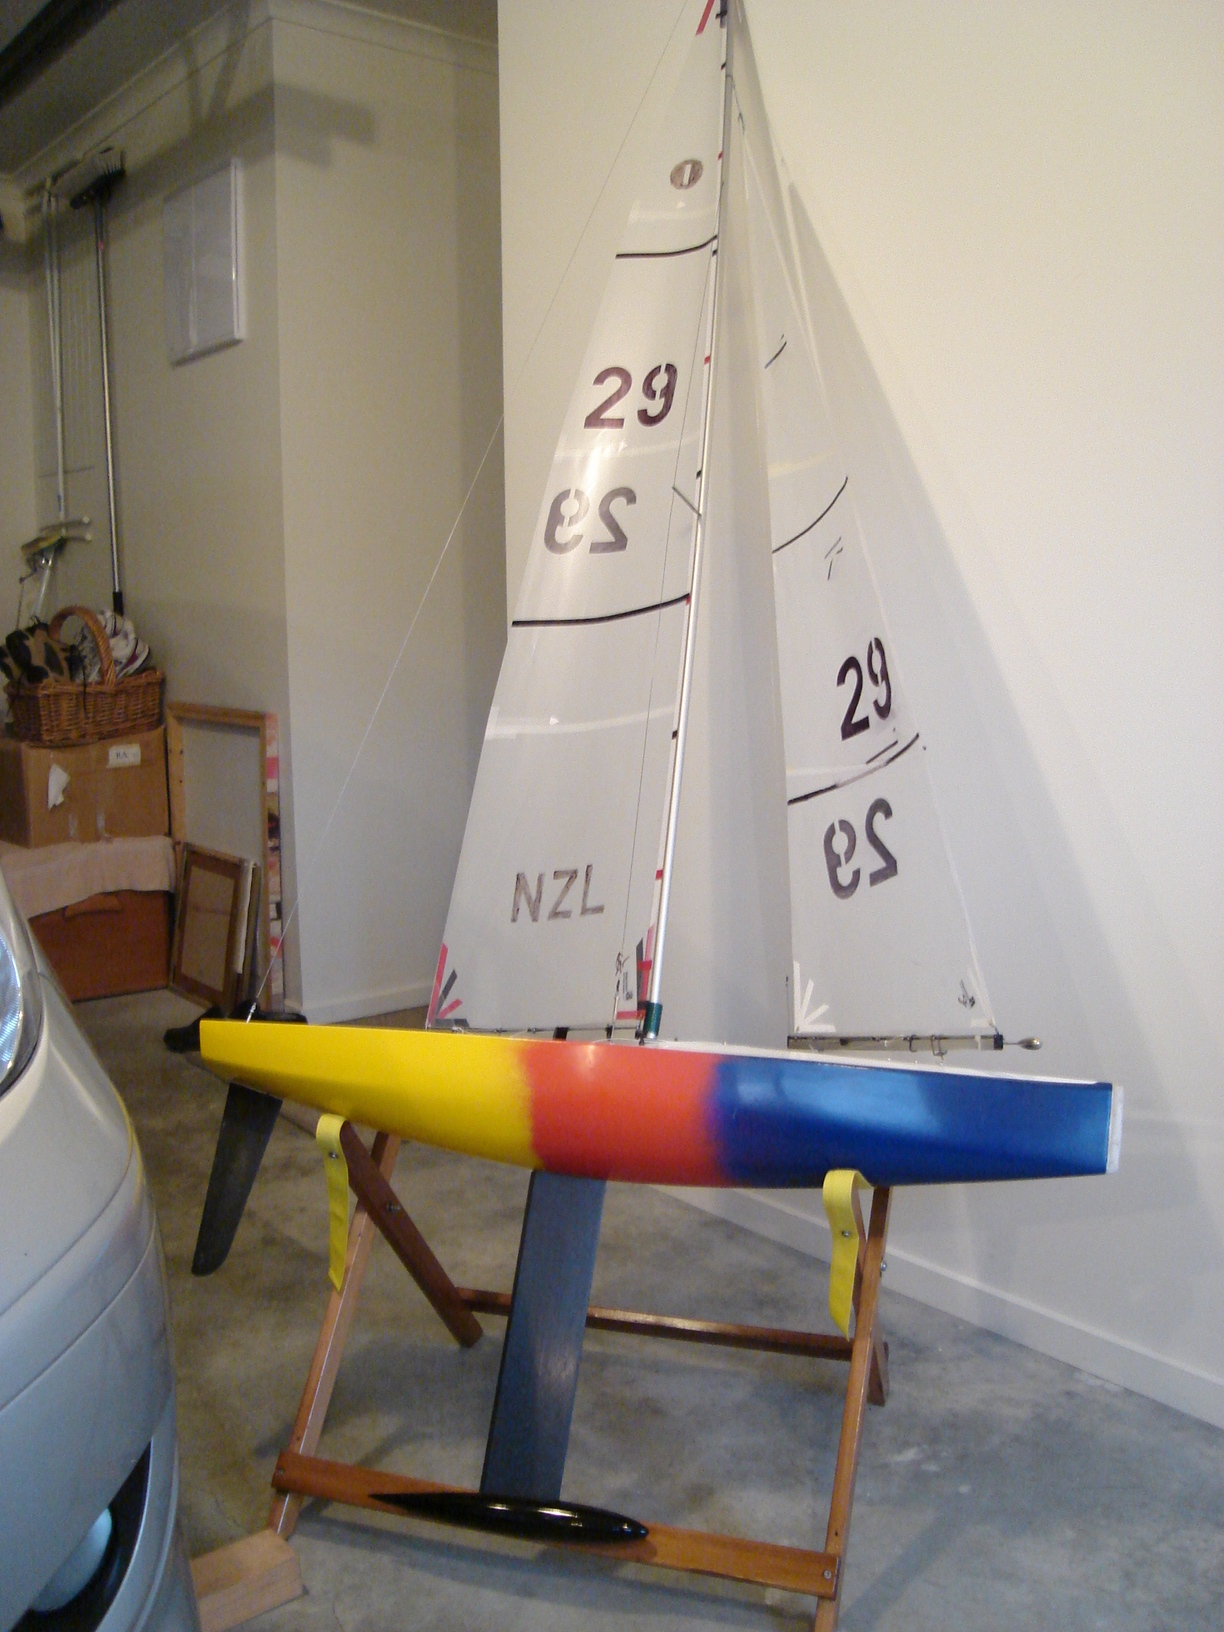
NZL 29 turned out to be quite a quick boat and made me look good for a beginner.
The next move was to decide what design to build, I wanted to build a woody to test my long dormant skills, so bought a set of plans from Ian Vickers for his latest design, a V8, which is a pretty quick design in the right hands.
Planning
After studying everything I could about building wood IOM’s on the web, I settled on 2.7 mm x 8 mm western red cedar planks, tapered to the bow and stern, glued with epoxy, and fibreglassed inside and out with 50 gram cloth using WEST epoxy.
I did consider using a PVA type aliphatic glue for the planking as the bond is excellent but was a little concerned the epoxy resin used when fibreglassing the hull may melt the PVA. PVA is cleaner, cheaper, quick drying, cleans up with water and kinder on the health than epoxy. Maybe next time I build I will try PVA.
I was very aware that the challenge would be to build as light as possible to be competitive with the fibreglass hulls. My goal was to achieve 100 grams of trim ballast when finished.
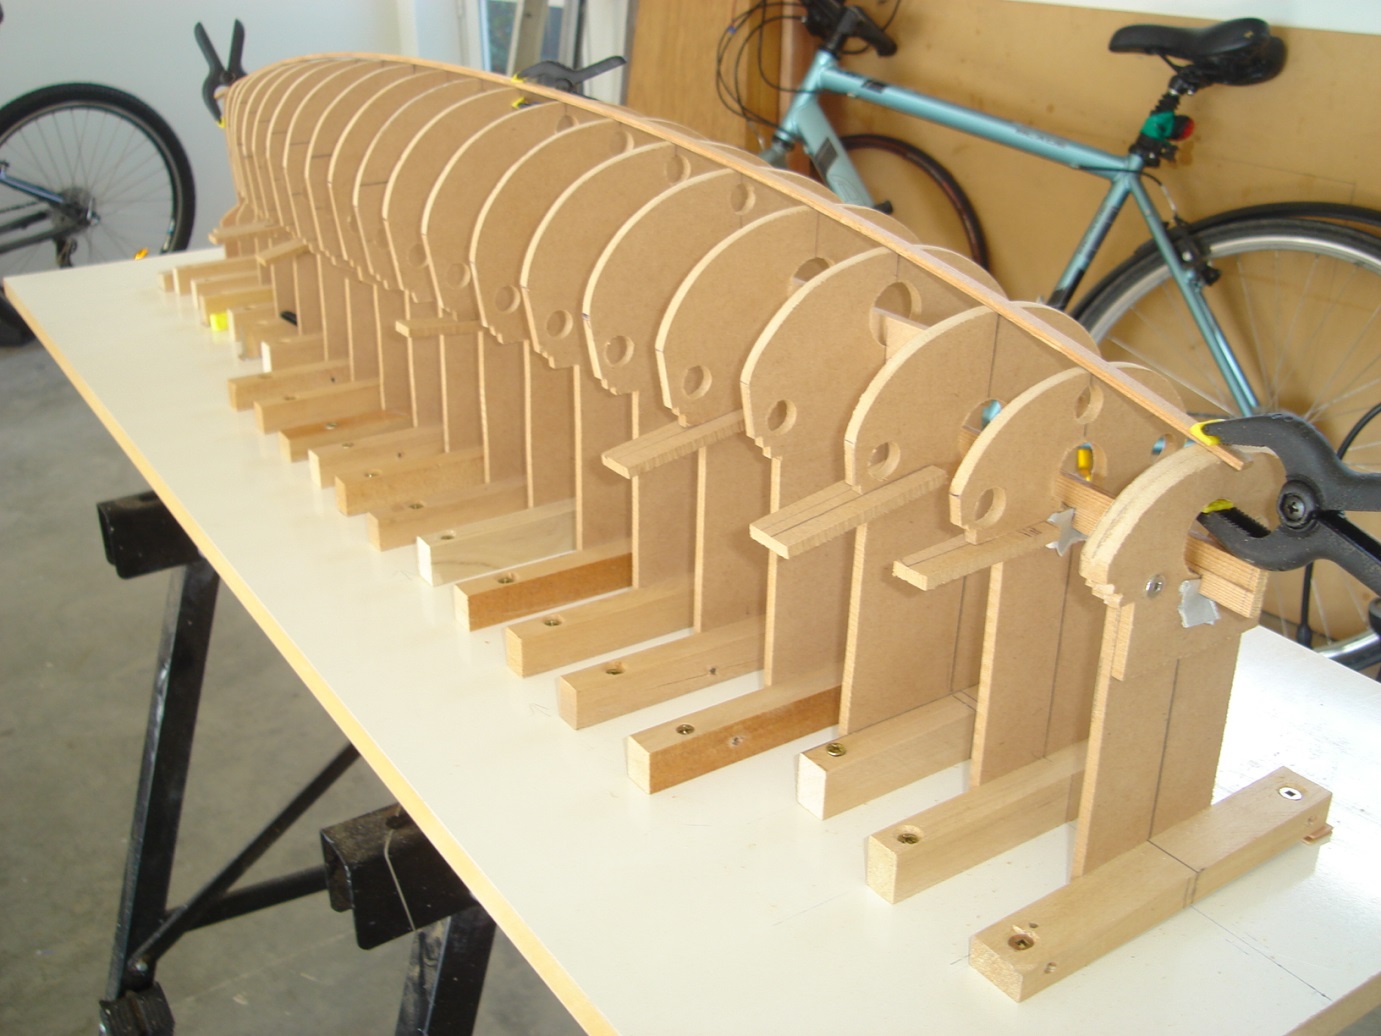
The jig
I cut the 20 frames out from Ian’s plan using 4 mm MDF board and set them up at 50 mm centres.
I cut the planks using a fine circular saw blade and so did not need to dress them further before planking the hull, as I knew I would be sanding the hull prior to fibreglassing.
I set up a “dummy” 4 mm MDF bow and transom with the idea that I could run the planking past the bow and stern and pin the planks to the dummies to avoid having pin holes in the finished hull.
I also checked out a rebate in the gunwhale of each frame and started my planking by fitting this inner gunwhale in 4mm cedar. I thought this would assist building some thickness to help in achieving the radius on the outside deck hull corner, but in reality it made planking this area very difficult and I would not do this again. I would glue an inner gunwhale in after the hull is turned over next time which would still allow me to radius the outside gunwhale to the plan.
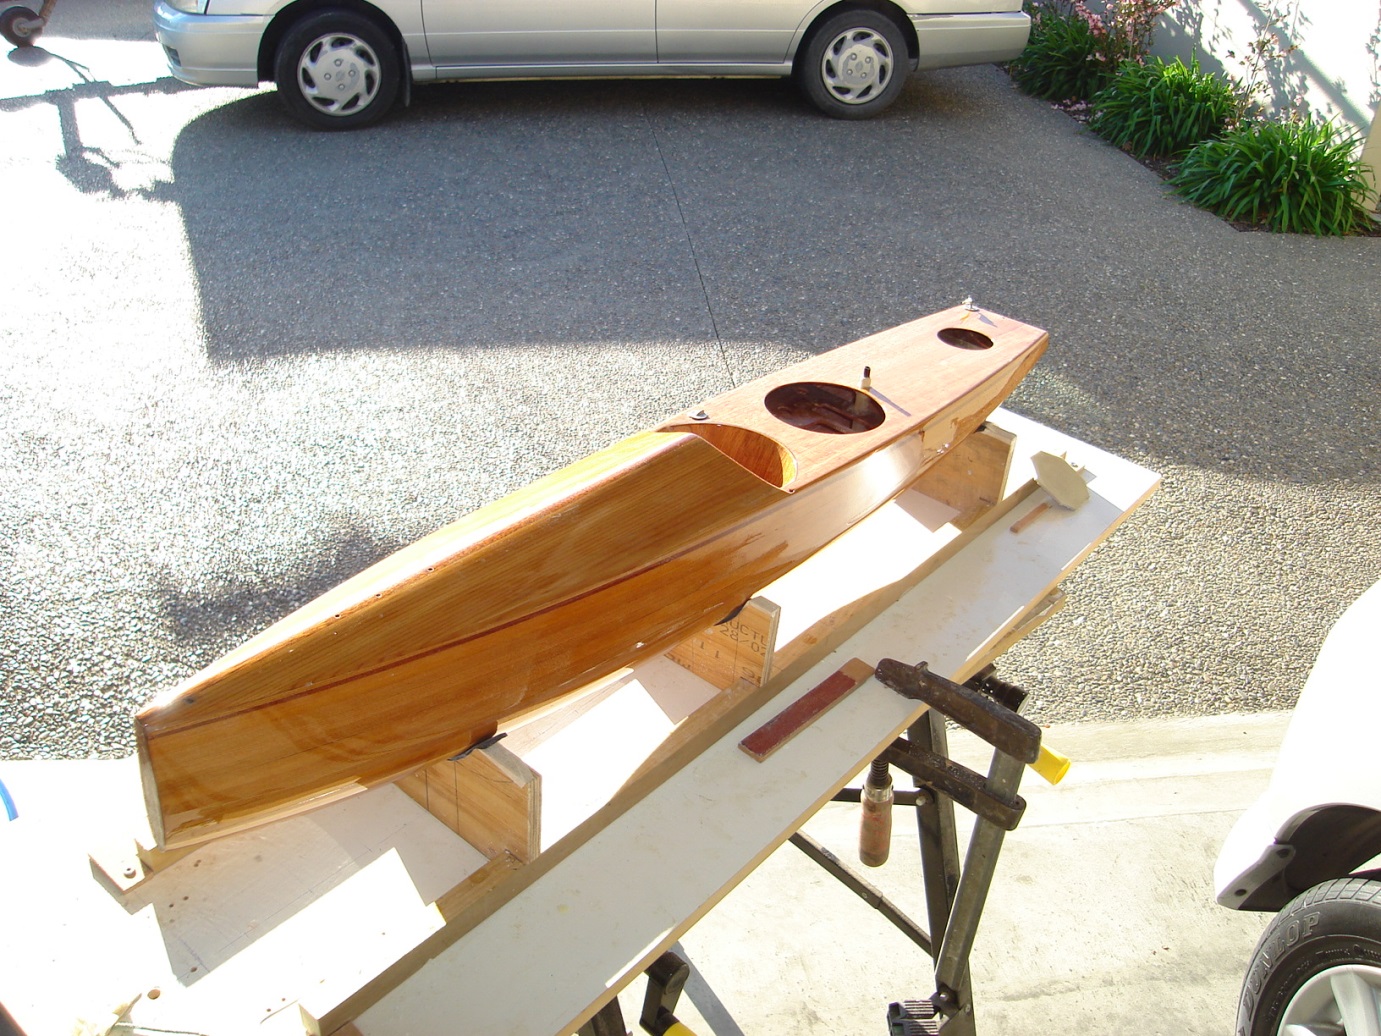
Planking
The first plank I laid down the keel centreline and I marked a hull centreline on both sides of this plank so I could find the centre of the hull later when fitting the keel box, mast step and rudder.
I tapered most planks prior to fitting (I bought a small Stanley plane and sat the planks in a 3 mm groove in my workbench.) ( Thanks for the tip Antonio ) and held them to the building jig with a combination of plastic clothes line pegs, masking tape and some swearing. I fitted a mahogany sheer plank to give the finished boat a contrasting colour in this area.
I have made the transom but will not fit it until the hull is off the jig and fibreglassed inside. Transom is a piece of 3mm cedar with a 1.5 ply backing.
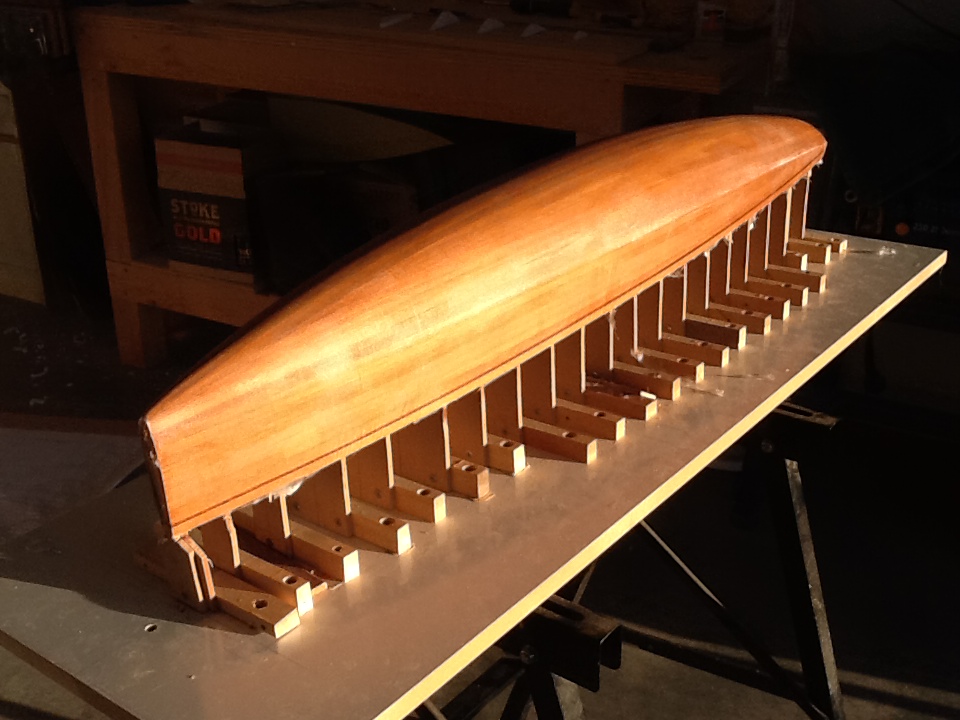
Once the planking was complete I sanded the hull to make sure it was fair, then fibreglassed it and laid a peel ply over the glass. Peel ply absorbs any extra resin and makes for a more even finish to the fibreglass cloth. Once the resin is dry I peeled off the peel ply, and prepared to lift the hull off the frames.
Fitout
I unscrewed the frames from the base board, turned the boat and frames up the right way, sat the hull into a cradle I had prepared and then removed the frames from inside the hull. They came out surprisingly easily as the hull is still a little “floppy” at this stage.
I then cut a plan profile from 4 mm MDF of the deck line perimeter from Ian’s plan and sat it over the hull at gunwhale level to confirm and hold the correct shape while I fitted the interior.
I also made a template of the exterior keel line or rocker to check the accuracy of my build once the boat is off the building frame. It is accurate to within 1 millimeter. (phew!)
I then fibreglassed the inside hull which was quite difficult and I ended up with a few air bubbles under the glass. I was concerned about weight and probably did not use enough resin inside, and once I laid the peel ply over the glass I could not easily see the air bubbles. Next time I would not try to lay one piece of fibreglass cloth to the interior, I wold break it into about 4 pieces making it easier to handle.
I laid 3 layers of 100 gram extra cloth in the keel box area, chain plates under the gunwhale, and rudder stock area inside the hull.
I purchased my centrecase, mast step, chain plate bulkhead, transverse rudder stock frame, keel and rudder from Mike Garden in Wellington. Mike build’s beautiful fibreglass V8s.
My lead bulb came from Steve Walters at Radio Yacht Supplies in Auckland, Steve builds bulbs for V 8 ‘s among other things. Steve’s bulb was overweight, and rather than risk destroying the moulded aerofoil shape, I bored some 8 mm holes in it to reduce the weight and filled them with a lightweight filler. Rather than use the normal brass tube for the rudder tube, I bought a 4 mm ID pultruded fibreglass tube from Gracol in Christchurch. (Gracol actually gave it to me as it wasn’t worth the trouble to invoice it). In my experience metal is a lot more difficult to achieve a good glue bond than fibreglass, hence my preference for the fibreglass tube. I also glued in a piece of this tube to fit my mast ram into under the foredeck so the ram goes into a tube that is sealed off from the inside hull to prevent any leaks.
Next job was to glue the mast step to the chain plate bulkhead, this was done on the work bench, then fitted and glassed into the hull.
I spent plenty of time making sure the hull was level and plumb while fitting these crucial parts.
Ian suggested I move the keel aft about 3 mm as the wood boat will be heavier than its fibreglass cousins and the V8 likes to be trimmed aft. I would not have the flexibility of putting in up to 300 grams of trim ballast that the glass hulls have.
My thoughts on the weight difference are that all boats will weigh 4 kg and the wood boats will have the weight spread fore and aft rather than the extra trim weight concentrated in the centre as the fibreglass models will have. This weight concentration in the center is the normal preference in yachts. I will be keen to see if it really does make a difference on the race course.
So I moved the keel, mast step, chain plates and jib boom attachments aft 3 mm.
After gluing the keel box in place I made two knees fore and aft of the box from 3 mm cedar and glued them in to the front and back of the box and along the keel line to the inside hull bottom. I am anticipating a few collisions on the race course and don’t want to tear the keel out. The mast base and chainplate bulkhead supplied by Mike was also glassed in at this time, and a “block” of epoxy fitted under the deck, then drilled and tapped for the chainplate bolts.
Interlude
Turning 65 I retired from work at the end of 2012 and we bought a campervan, went tripping around our South Island of New Zealand for 8 weeks, then visited my wife’s parents in Brisbane for a couple of months, then to Perth to visit our grandchildren for a month, then as summer arrived, I bought another Laser and went into training as the NZ Laser championships were in my home town of Nelson in Jan 2014, so very little boatbuilding took place in 2013.
After another 6 weeks at the top of the North Island in our campervan in February, March 2014, I was ready to finish the V8.

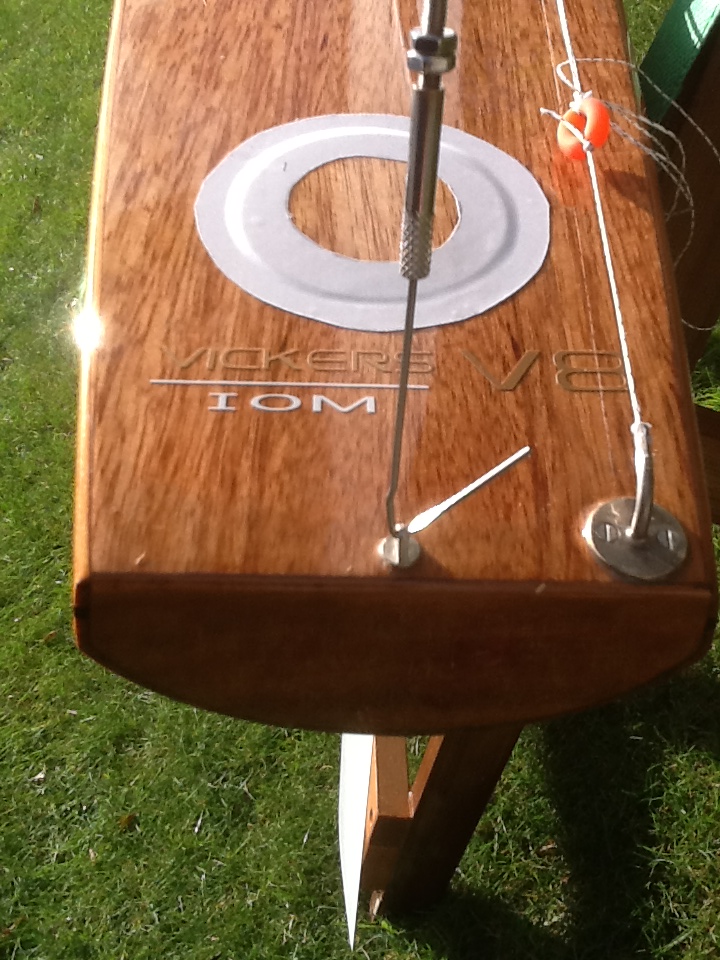
Next job was the framing under the foredeck to take the loads from the jib boom. I made up three deck beams, a centre kingplank, and also built a couple of vertical cedar posts connecting the deck to the keel to transfer the loads. I also fitted the 3 bolts for the A, B and C rigs boom attachment through the deck and epoxy glued their nuts under the beam. I built the sailwinch combined rudder servo mount from 4 mm marine ply and glued it to each side of the hull and also to the mainsheet post tube. I am mounting my rudder head under the deck and so Mike Garden supplied me a beam to glue in aft to take the rudder stock and tiller arm loads.
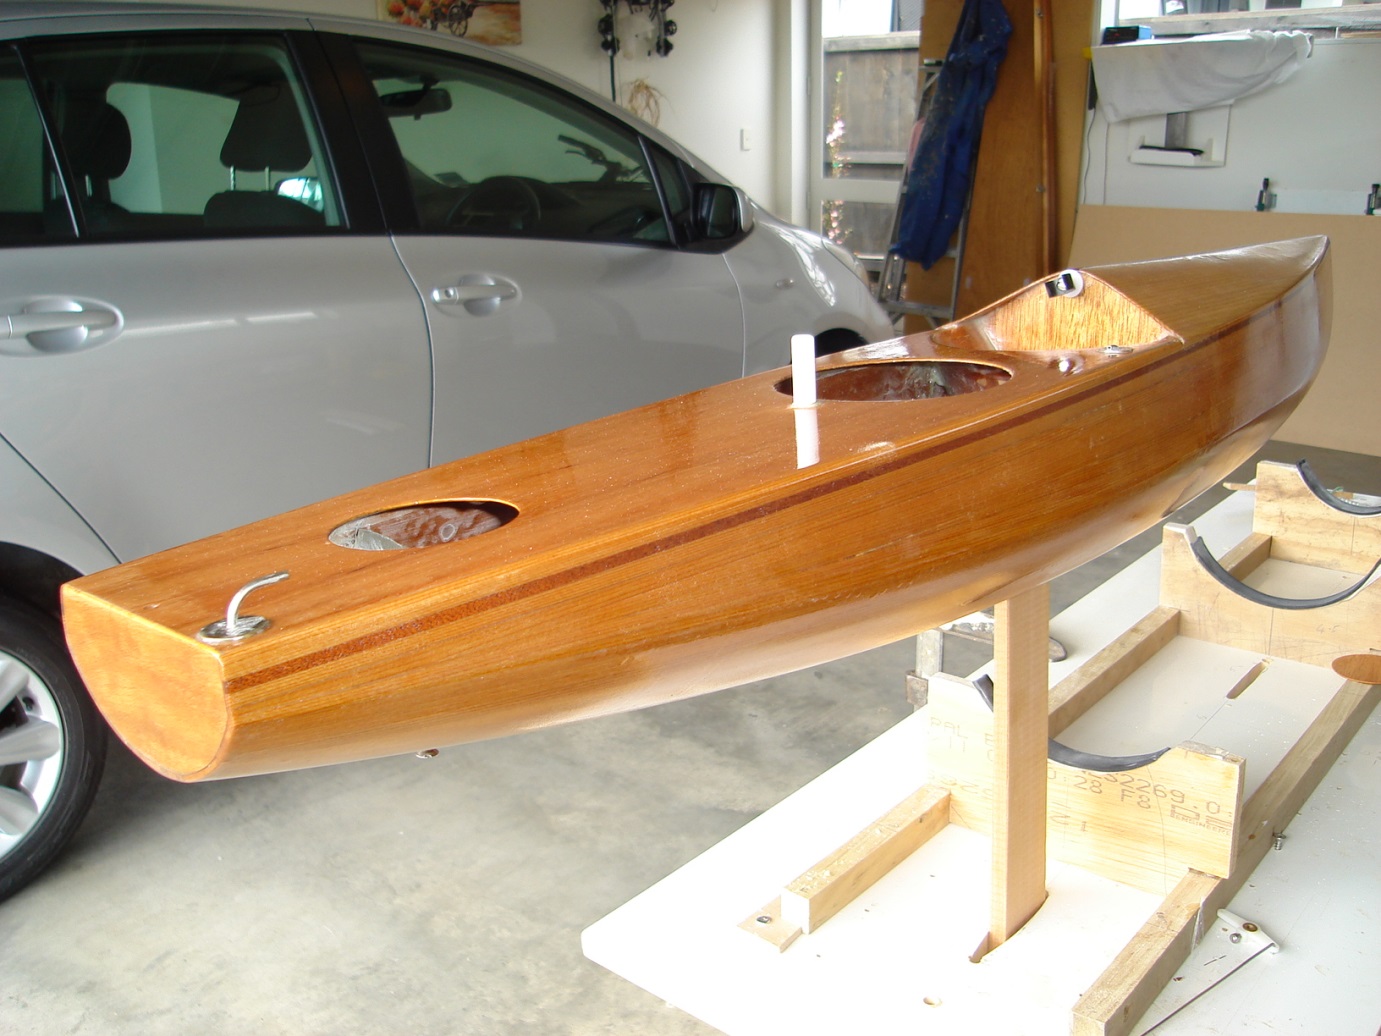
Next job was to make the aft deck from 1.5 mm ply with circular access holes for the rudder stock and RMG sailwinch and battery.
The foredeck was made from 1.5 mm cedar and I forced the shape into it as I glued it down, with some weights on it. Then I glassed the foredeck with 50 gram cloth and epoxy.
If I build another IOM, for the deck I will try using .7 mm veneer glassed both sides with 50 gram cloth to keep the weight down and also keep the timber look.
For the mast ram I bored a clearance hole into the kingplank, and glued my 4 mm ID fibreglass tube in. Then I fitted my chain plates, rudder stock, jib boom attachments, sheet leads, all glued in with epoxy glue. My glue is WEST epoxy resin thickened with “aerosil or “glue powder.
For the bow bumper I wrapped masking tape around the bow and left the tape protruding about 15mm forward and filled this cavity with white Sika, then sanded the shape to it once the Sika dried.
I fitted an alloy tube inside the masts at the goosenecks and drilled and screwed the goosenecks through the mast wall and the inner tube. I also coated all screws going into the alloy masts in zinc chromate paste to avoid corrosion as we sail in salt water here in Nelson.
After having trouble with electronics and corrosion with my existing IOM and after reading an article by Garry Bromley in the Australian Radio Yachting website, I bought a product called Corrosion X and liberally coated all my electrical connections and turnbuckle threads with this liquid.
I also took Garry’s advice and used XT60 connectors on all my electrics as they are more waterproof than most others.
The bulb was then fitted to the keel and the rudder and keel checked and fitted to the hull. I am a little concerned about water forcing up the rudder tube into the hull when the boat is running fast and so coated the stock with Vaseline to minimise any water ingress. Time will tell whether this works. As Ian suggested, I also put a dab of Sika sealant over the holes in the tubes that take the sheets below decks to minimise any water getting down here.
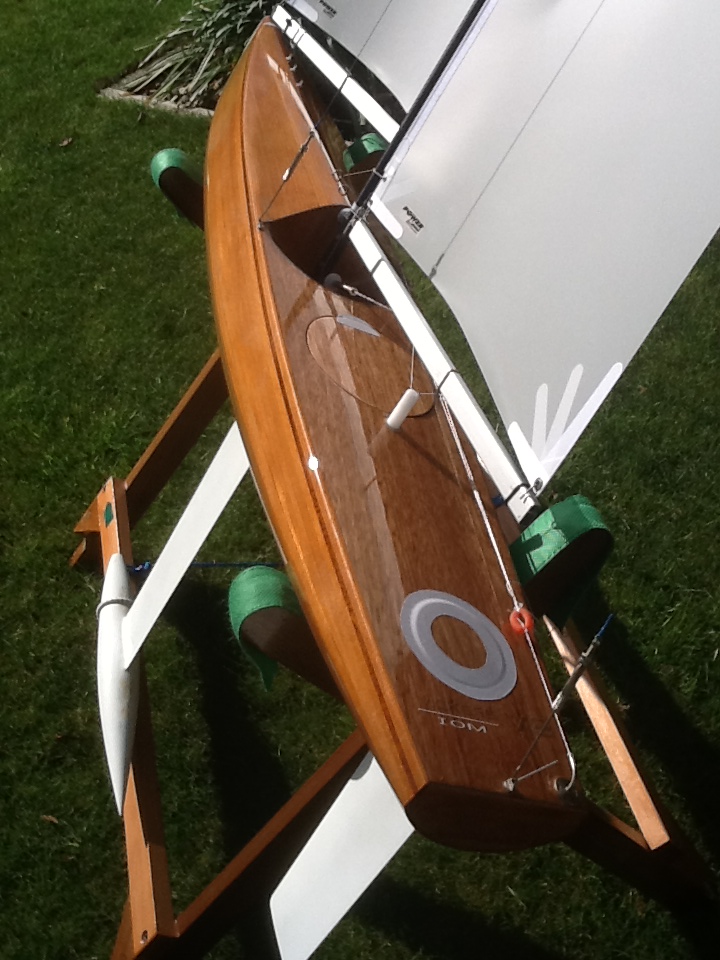
I sprayed an Awlgrip single pot varnish to the boat, but any good polyurethane varnish will be adequate.
The Rigs
I followed Ian’s instructions on all the measurements for the A, B and C rigs, and all worked out fine.
I purchased my sails from Gerry at Powersails as he also owns a V8. The luff curve he cuts on the A rig mainsail is 9 mm so I set the mast up to match this curve.
The completed boat weighed in at 3930 grams, 70 grams under the 4 kg minimum, fully rigged “A” rig, with a 5 cell NiMH battery.
April 19. 2014
I took my new V8 out to a fresh water pond to launch and have a test sail. Wind was 12 to 14 knots and gusting so I tried both A and B rigs and while no other boats were present to race against, she felt OK, and sailed herself for 100 metre beats without me touching the tiller.
Downwind I need to adjust the travel of the sails but she ran well and when she did try to nosedive I found I could shake her out of the nosedive with a flick of the rudder.
So the coming weeks will tell me how my new treasure will really perform as I get her tuned up and start racing against my local fleet.

If you have any questions on my build of this V8, send me an email and I will do my best to answer you.
Basil Hart.
basilandjackihart@gmail.com
Nelson. New Zealand
I am already thinking of how I can build an IOM better and lighter in wood next time.

Hi Basil, your boat looks fantastic and I really appreciate wooden hull construction. Having built fibre glass
IOM hulls, I much prefer using western red cedar, as I find that is much easier to come inside the weight
limit, and so far the hull appears to be a lot stiffer once again this is my own opinion. The last IOM I built
is a Frank Russel Goth mk 4. cedar hull a very light weight cloth, resin I use is Altec 4 to 1. You mention
in your build that you were not to sure about using PVA glue for planking, it is perfectly safe and will not be
effected by epoxy resin to give you an example I seal my cedar prior to glassing with 50% thinning of the
epoxy resin, this also helps strengthen the cedar, any if grain lifts can be lightly sanded to stop the glass
snagging when wetting out. My boat weight in at 117grams under when measured by good luck I am not sure.
Keep at it,
Gordon.
ı have built 4 v8 s in the last 2 years, mahogany, cedar, linden and ayous (spanish cedar).
my version that i got from ian is different then yours, do you have the laser cut files for new version?
Hi Moris
The best person to talk to about this is our Commodore, Basil. His email: basilandjackihart@gmail.com
Thanks for your informative post. Over the past few years I have built a Frank Russell Goth X, Ellipsis, Equinox and the prototype Paperclip Mk3 and I’m currently building a 3mm balsa plank on frame V8. I always struggle to keep the gross boat weight of my IOM boats to around the 4kg minimum and usually I’m happy if I can keep the weight to 150gm over weight. I do have a problem with compromising good building practice and under-engineering hulls solely to score the few extra grams but having built quite a number of hulls one develops sneaky ways of removing weight without drastically reducing strength.
Thanks again.
Tony,
Melbourne
Hi Tony, I have built a V8 from Ian Vickers plans and used western red cedar for planking 3mm by 10mm and deck 2mm x 10mm and then skinned with a light weight
cloth on the outside of hull, inside of hull 2 coats of thinned epoxy resin. All the
rest of the build is light weight model air craft ply. the other parts to make sure
that their weight right are fin, bulb, rudder blade. I also have built a Goth MK4 and both these boats have been at least 100grams under weight. Any question just ask
boat building you never stop learning.
Cheers Gordon Duell